Adding Areas
Use the Add Area toolbar to define an area in MGP Xpress. Areas are used in the Search Results panel to locate imagery in a defined location.
Select Add New Area. The Add Area toolbar displays.

Add Area toolbar.
Do one of the following, depending on the type of area you want to add.
 Draw a Rectangle
Select Draw a Rectangle. The cursor changes to a hand with a trailing blue dot
 to indicate that the drawing tool is active.
On the map, select a starting point, then drag to draw a rectangle.
A callout indicates the rectangle's area as you drag.
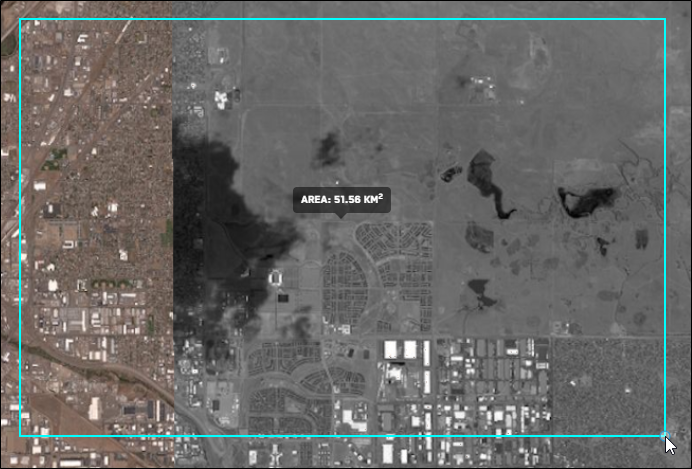
Current area of the rectangle.
When the rectangle covers your desired area, single-click to complete it.
(Optional) If you want to rotate the new rectangle, do the following:
Select Edit Area.
While in the Edit interface, hold SHIFT, then click and drag a corner or side to rotate the rectangle.
Select Finish Editing Area.
See Editing Areas.
Draw a PolygonSelect Draw Polygon. The cursor changes to an arrow with a trailing blue dot
to indicate that the drawing tool is active.On the map, select a starting point, then select at least two additional vertices.
As you draw the polygon, a callout indicates the length of each segment.
After you have selected at least three vertices, a callout indicates the potential area of the polygon if you were to close it.
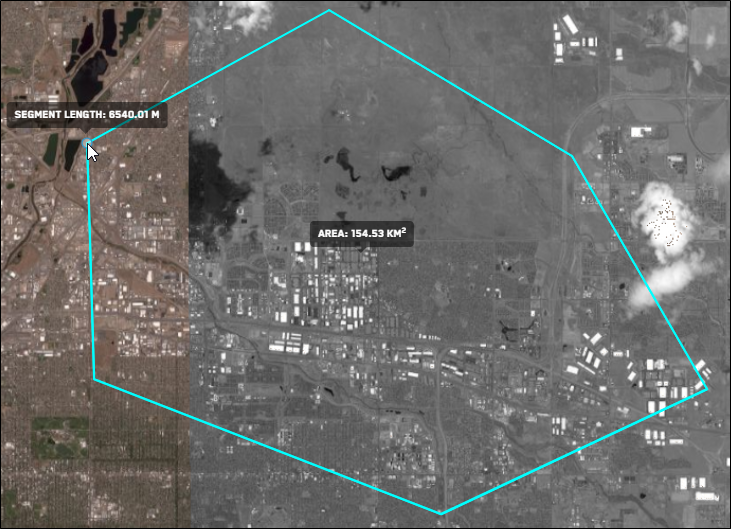
Current area of the polygon.
To close the polygon, do one of the following:
Manually Close the Polygon Manually connect your last vertex to the starting point, closing the polygon. When your cursor is close to the starting point, MGP Xpress will snap the cursor to the starting point so there are no gaps in the polygon.
Automatically Close the Polygon Double-click anywhere on the map to automatically draw a straight line to the starting point, closing the polygon.
Draw a Rectangle from a Center pointSelect Rectangle from Centerpoint. The Enter Rectangle Coordinates dialog opens.
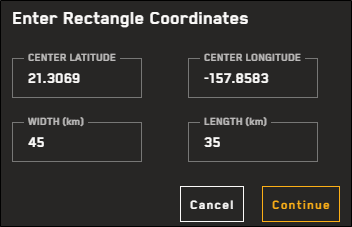
The Enter Rectangle Coordinates dialog.
In the fields, enter your desired centerpoint coordinates, as well as the width and length of the rectangle (in kilometers).
All fields are required.
You must use latitude/longitude pair format (e.g., 21.3069, -157.8583). Other coordinate pair formats are not accepted.
If the format is invalid or the latitude/longitude does not exist, an error displays.
Select Continue. The area displays in the viewport and is added to your search results.
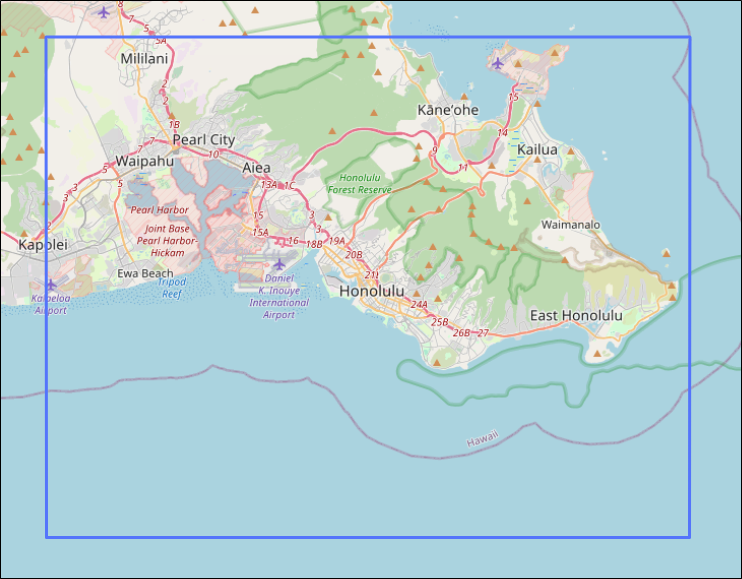
A rectangle added from center point coordinates.
On the toolbar at the top of the viewport, select Save Area. Your new area is added to the Search Results panel.
This step does not apply to rectangles created from a center point, which are automatically saved when you select Continue in the Enter Rectangle Coordinates dialog.
(Optional) Areas are automatically named (e.g., "Area 1," "Area 2"). If you want to rename the area, in the Search Results panel, double-click the automatic area name and enter a new name.
More Information About Drawing Areas
You can draw/import multiple areas and have multiple areas available in the Search Results panel. However, you can only expand imagery results for one area at a time. New areas are automatically expanded when you draw them; collapse the new area to see all areas, or select the More Areas button at the bottom of the Search Results panel to quickly select and view a different area.

More Areas button
You can search for one or more image IDs using the Search Results panel. If you search for an image ID and the image is found, an area is drawn around the image and it is added to the search results. Each found image is added as a separate area. Expand any area to view the image and its metadata.
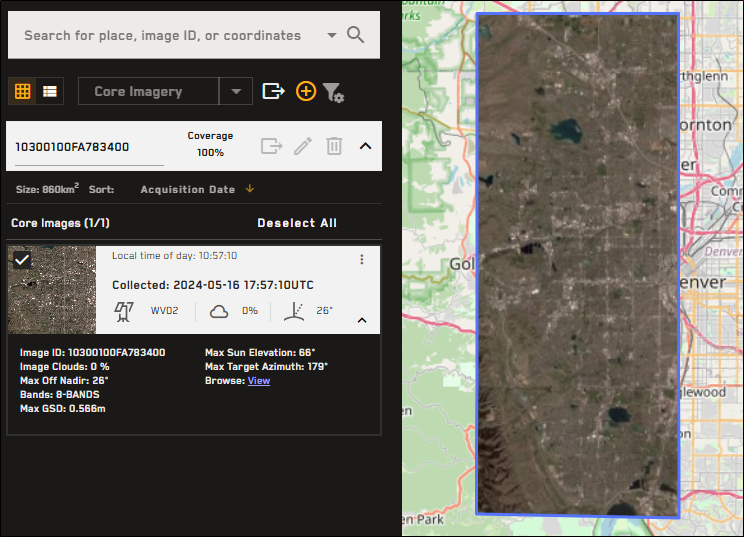
Search for an image ID using the Search Results panel to add the image as an area. Expand the area to view the image and its metadata.

You can also search for multiple image IDs at once to add each image ID as a separate area.
To cancel a shape before it is complete, select ESC on your keyboard, or click Cancel in the instruction box at the top of the viewport.
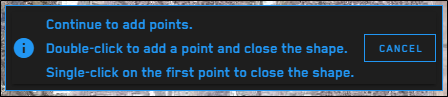

An instruction box displays at the top of the viewport when drawing an area.
To edit a new area before you save it, on the toolbar, select Edit Area. To edit saved areas, in the Search Results panel, select Edit Area
 . See Editing Areas.
When editing an area, to remove a completed—but unsaved—shape from the viewport, on the toolbar, select Remove Shape. Draw a new area or select Cancel.
Areas cannot exceed 5,000,000 sq km. If your area is larger than 5,000,000 sq km, you will receive an error.
By default, imagery results in MGP Xpress are visible as low resolution browse imagery. When you draw an area, a message displays indicating that you are viewing products in low resolution. Purchase an image to view it in high resolution. See Cart.
You can only add one product type to your cart at a time. For example, if you have Core Imagery in your cart, and you switch to a Vivid product and draw an area, the Add to Cart button will be deactivated. If you hover over the Add to Cart button, a message informs you that you can only add one product type to your cart per transaction.