Filtering Areas
When you draw an area, you will see the imagery that appears in that area. Filters allow you to narrow down the imagery in each area even more, by applying limitations on the imagery based on its metadata (e.g., cloud cover, start date, imagery type). You can apply global default filters to all your areas at once, or you can apply individual area filters to specific areas in your search results. This allows you to see only the imagery that is most relevant to you.
Applying Global Default Filters
You can change the standard default filter settings to apply your preferred filter settings to all of your areas at once. These global default filter settings are inherited by all areas, including any new areas that you create.
- Select Search
 . The Search Results panel opens.
 Select Global Default Filters
 . The Global Default Filters dialog opens.
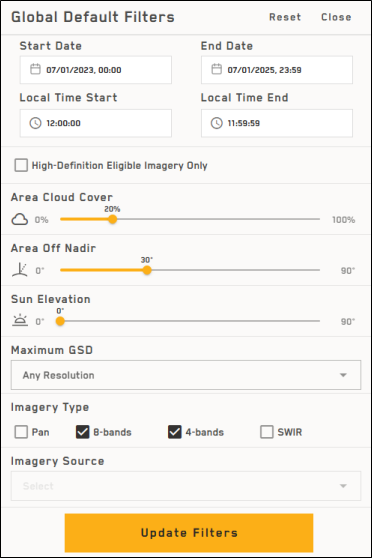
Global Default Filters dialog
Specify the parameters for each global default filter you want to apply.
 More Information
Start Date / End Date Use the calendar picker to enter the start and end dates for the imagery you want to view. Select the clock
 to filter based on the time imagery collection began (based on UTC).
Local Time Start / Local Time End Use the arrow pickers to set the local start and end times. Local time uses the image’s centroid as the reference.
More Information: Date and Time vs. Local TimeYou must be logged in to use Local Time filters.
The determination for local time is divided by the 25 nautical time zones, not administrative local time.
In this example, the filter identifies imagery with a collection start time between 3/18/2023 and 3/18/2025, beginning at 12:00:00 UTC and ending at 11:59:59 UTC. The filter also identifies imagery collected on those dates with a local time between 12:00:00 and 11:59:59.
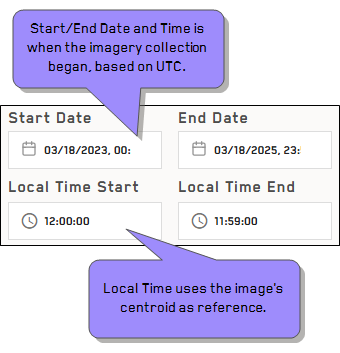
The following image shows three image results from this filtered search. Notice the difference in the collected time and the local time for each image.
High-Definition Eligible Imagery Only If you want your search results to only include high definition imagery, select the checkbox.
When you select High-Definition Eligible Imagery Only, the available ranges for GSD, Area Off Nadir, and Sun Elevation automatically adjust to ensure the best possible imagery results.
GSD ≤60 cm (i.e., 70cm not available)
Area Off Nadir 0° – 30°
Sun Elevation 15° – 90°
Be sure to check your filter settings if you have previously made changes to these filters.
Area Cloud Cover (0% – 100%)Use the slider to set the maximum area cloud cover percentage (i.e., the percentage of an area that is covered by clouds).
More Information: Area Cloud Cover vs. Image Cloud CoverArea cloud cover indicates the amount of cloud cover for an image strip within the selected area, while image cloud cover indicates the amount of cloud cover over the entire image strip. Depending on the size of the area and the location of each image strip in the area, the area cloud cover and image cloud cover percentages for each image strip may be very different, or they may be identical.
You can view an image's cloud cover in its metadata.
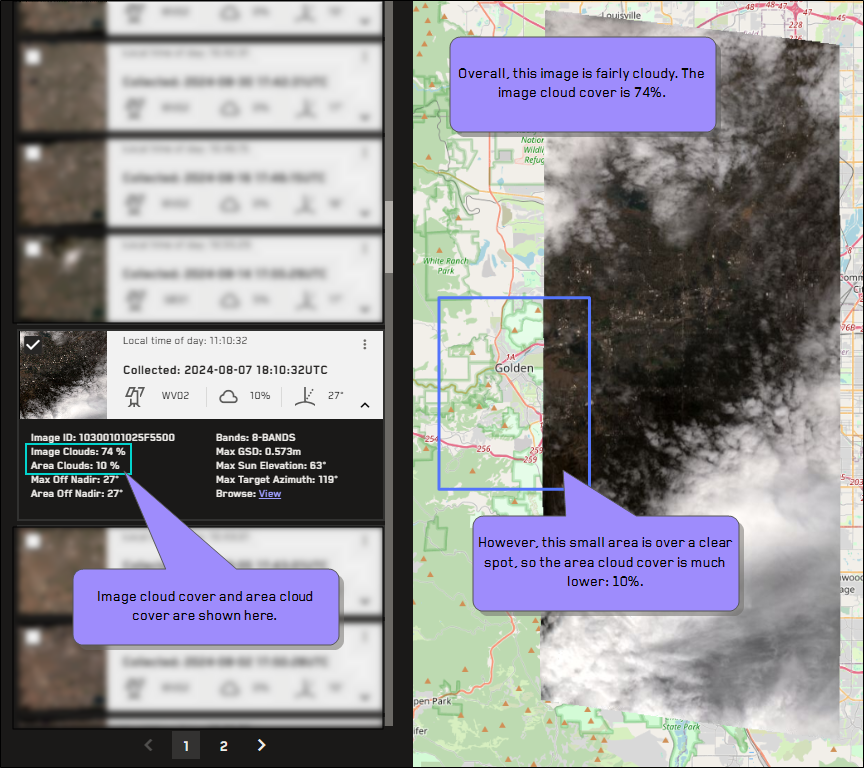
In this example, the image cloud cover is 74%, but the area cloud cover is only 10%.
Area Off-Nadir (0° – 90°) Use the slider to set the maximum angle of a satellite in comparison to the location of the area on Earth captured by the satellite image.
This setting changes if you select High-Definition Eligible Imagery Only.
Sun Elevation (0° – 90°) Use the slider to set the maximum sun elevation angle.
This setting changes if you select High-Definition Eligible Imagery Only.
Maximum GSD From the drop-down, select the ground sample distance (GSD) you want for your imagery results. Resolution is determined by the GSD. GSD is the maximum size (in meters) of one pixel on the ground. The lower the number, the more accurate (and sharper) the image will be.
Any resolution
Less than 70 cm
Less than 60 cm
Less than 50 cm
Less than 40 cm
This setting changes if you select High-Definition Eligible Imagery Only.
Imagery Type Select the imagery type(s) you want for your imagery results.
Pan Black-and-white imagery
8-bands Multicolor imagery, useful for mineral exploration, wildfire monitoring, and coastal zone mapping.
4-bands Multicolor imagery, useful for analyzing vegetation health, land use, and urban development.
SWIR Shortwave infrared (SWIR) is a part of the electromagnetic spectrum that is beyond the visible light that our eyes can see. It can penetrate atmospheric haze and smoke, and it can also detect differences in the reflectance and absorption of different materials
Imagery Source From the drop-down, select one or more satellites that you want to use as the source of your imagery.
GE01 GeoEye-1
WV01 WorldView-1
WV02 WorldView-2
WV03 WorldView-3
WV04 WorldView-4
LG01 Legion-1
LG02 Legion-2
LG03 Legion-3
LG04 Legion-4
LG05 Legion-5
LG06 Legion-6
QB02 Quickbird-2
IK02 Ikonos-2
Imagery Source filtering is only available when Imagery Type filters are not applied.
To update the global default filter settings, select Update Filters.
Applying area filters disables global default filter settings. When you make new changes to global default filters, the global default filter settings overwrite all previous area filter settings.
To reset global default filter settings to the standard default, select Reset.
A confirmation dialog asks you if you want to apply the global filters. To apply the global default filters, select Apply Global Filters. Otherwise, select Cancel.
Setting global default filters overrides any area filters you previously set. If you apply global default filters, your area filter changes will be lost and you will need to make these changes again.
Applying Area Filters
Although each area inherits global default filter settings, you can edit the filter settings for specific areas to further refine your image results. Area filters apply only to the selected area and override global default filter settings.
If you change area filter settings, global default filters are turned off. When you make new changes to the global default filters, the global default filter changes overwrite any area filters that you applied to individual areas.
- Select Search . The Search Results panel opens.
Next to any area, select
 to expand a list of the imagery contained within that area.
In your Imagery Results, select Area Filters
. The Area Filters dialog opens.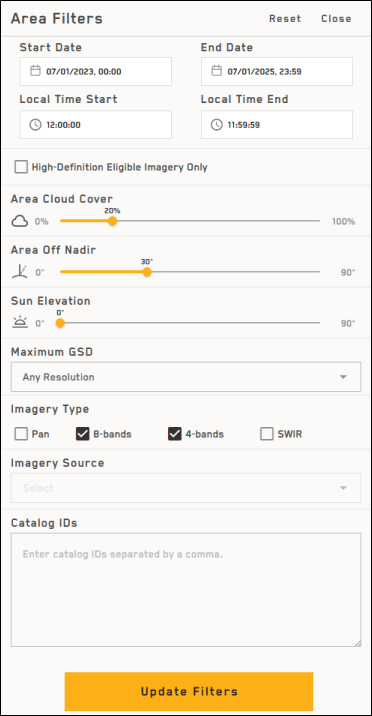
Area Filters dialog
Specify the parameters for each filter you want to apply.
More InformationStart Date / End Date Use the calendar picker to enter the start and end dates for the imagery you want to view. Select the clock
to filter based on the time imagery collection began (based on UTC).Local Time Start / Local Time End Use the arrow pickers to set the local start and end times. Local time uses the image’s centroid as the reference.
More Information: Date and Time vs. Local TimeYou must be logged in to use Local Time filters.
The determination for local time is divided by the 25 nautical time zones, not administrative local time.
In this example, the filter identifies imagery with a collection start time between 3/18/2023 and 3/18/2025, beginning at 12:00:00 UTC and ending at 11:59:59 UTC. The filter also identifies imagery collected on those dates with a local time between 12:00:00 and 11:59:59.
The following image shows three image results from this filtered search. Notice the difference in the collected time and the local time for each image.
High-Definition Eligible Imagery Only If you want your search results to only include high definition imagery, select the checkbox.
When you select High-Definition Eligible Imagery Only, the available ranges for GSD, Area Off Nadir, and Sun Elevation automatically adjust to ensure the best possible imagery results.
GSD ≤60 cm (i.e., 70cm not available)
Area Off Nadir 0° – 30°
Sun Elevation 15° – 90°
Be sure to check your filter settings if you have previously made changes to these filters.
Area Cloud Cover (0% – 100%)Use the slider to set the maximum area cloud cover percentage (i.e., the percentage of an area that is covered by clouds).
More Information: Area Cloud Cover vs. Image Cloud CoverArea cloud cover indicates the amount of cloud cover for an image strip within the selected area, while image cloud cover indicates the amount of cloud cover over the entire image strip. Depending on the size of the area and the location of each image strip in the area, the area cloud cover and image cloud cover percentages for each image strip may be very different, or they may be identical.
You can view an image's cloud cover in its metadata.
In this example, the image cloud cover is 74%, but the area cloud cover is only 10%.
Area Off-Nadir (0° – 90°) Use the slider to set the maximum angle of a satellite in comparison to the location of the area on Earth captured by the satellite image.
This setting changes if you select High-Definition Eligible Imagery Only.
Sun Elevation (0° – 90°) Use the slider to set the maximum sun elevation angle.
This setting changes if you select High-Definition Eligible Imagery Only.
Maximum GSD From the drop-down, select the ground sample distance (GSD) you want for your imagery results. Resolution is determined by the GSD. GSD is the maximum size (in meters) of one pixel on the ground. The lower the number, the more accurate (and sharper) the image will be.
Any resolution
Less than 70 cm
Less than 60 cm
Less than 50 cm
Less than 40 cm
This setting changes if you select High-Definition Eligible Imagery Only.
Imagery Type Select the imagery type(s) you want for your imagery results.
Pan Black-and-white imagery
8-bands Multicolor imagery, useful for mineral exploration, wildfire monitoring, and coastal zone mapping.
4-bands Multicolor imagery, useful for analyzing vegetation health, land use, and urban development.
SWIR Shortwave infrared (SWIR) is a part of the electromagnetic spectrum that is beyond the visible light that our eyes can see. It can penetrate atmospheric haze and smoke, and it can also detect differences in the reflectance and absorption of different materials
Imagery Source From the drop-down, select one or more satellites that you want to use as the source of your imagery.
GE01 GeoEye-1
WV01 WorldView-1
WV02 WorldView-2
WV03 WorldView-3
WV04 WorldView-4
LG01 Legion-1
LG02 Legion-2
LG03 Legion-3
LG04 Legion-4
LG05 Legion-5
LG06 Legion-6
QB02 Quickbird-2
IK02 Ikonos-2
Imagery Source filtering is only available when Imagery Type filters are not applied.
Catalog IDs To search by specific catalog ID(s) within the area, enter one or more catalog IDs separated by a comma.
To apply the area filter settings, select Update Filters.
Area filters only affect imagery within the selected area. You can apply different area filter settings to each area in your search results.
Applying area filters disables global default filter settings. When you make new changes to global default filters, the global default filter settings overwrite all previous area filter settings.
To reset area filter settings to the global default filter settings, select Reset.