Overview: Search Results Panel
You will use the Search Results panel for most imagery-related tasks in MGP Xpress, so it's important to know where everything is!
There are two main parts of the Search Results panel:
the Search Results panel as a whole,
and
imagery results for each area that you have drawn or uploaded. These results are visible as tiles or as a list.
Search Results
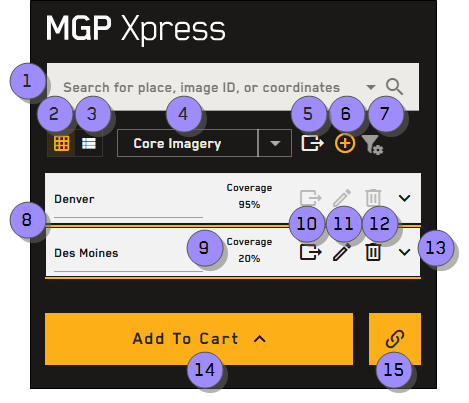
Use the overview image below and its corresponding table to locate tools in the Search Results panel.
| Numbered Area | Description | ||||
|---|---|---|---|---|---|
1 Search | Use the search box to quickly find a location, address, coordinates, or image IDs. When entering a location or address in the search box, matching locations auto-populate in a list. You can optionally select a location from the list to quickly jump to that location. When searching for one or more image IDs, images are added as areas in the search results. See Searching. | ||||
2 Tile View | Tile view is the default view for imagery results. If you are in list view, select this option to switch back to tile view. | ||||
3 | Switch from card view to list view. | ||||
4 | The Product drop-down is a type of filter for the product categories that should display in the Search Results panel (e.g., core imagery, stereo imagery, Vivid imagery). Core Imagery is selected by default. To see more details about a product category, hover over the information icon When you select a Vivid product, additional imagery functionality becomes available in the interface. See Viewing Vivid Basemaps. When changing product types, your filters and selected images are saved. The Tasking AOI product option only applies to Salesforce users. However, if you simply want to create an AOI for export without returning any imagery, you can select this option. Create an AOI, then export it to use in a third-party program. | ||||
5 Export All Areas | Export all areas to a GeoJSON, KML, or shapefile. Copy all areas' details to the clipboard for use in another program. See Exporting Areas. | ||||
6 Add Area | Select the Add Area tool to draw polygons and rectangles, or to import an existing area. | ||||
7 Global Default Filters | Set global default filter options for all areas. When you set or change global default filters, all areas inherit these settings. If you change area filter settings, global default filters are turned off. When you make new changes to the global default filters, the global default filter changes overwrite any area filters that you applied to individual areas. | ||||
8 Areas | Available areas. Select an area name to edit it. The selected area is outlined in yellow. | ||||
9 Area Image Coverage | Percentage of the area currently covered by selected imagery. Making additional image selections or removing the current selections may increase or decrease the imagery coverage percentage. | ||||
10 Export Area | Export the selected area to a GeoJSON, KML, or shapefile. Copy the area's details to the clipboard for use in another program. See Exporting Areas. | ||||
11 Edit Area | Edit the selected area. See Editing Areas. | ||||
12 Delete Area | Delete the selected area. See Deleting Areas. | ||||
13 Show / Hide Imagery Results |
| ||||
14 Add to Cart | Add all selected imagery to your cart. Areas must be larger than 25 sq km, smaller than 10,000 sq km, and have 100% coverage to add imagery to the cart. You can add one area to your cart at a time. | ||||
15 Permalink | Create a permalink to save and share your session with others. See Sharing Sessions. |
By default, new areas are named “Area <n>”, where n is an incremental number defined by the order in which the area was created.
Area name(s) in an imported session are derived from the area(s) in the file.
Area names are used as the file name when downloading an area.
When you draw a new area, it appears at the top of the search results list.
Imagery Results (Tile View)
When you expand an area, you will see imagery that is available in that area.
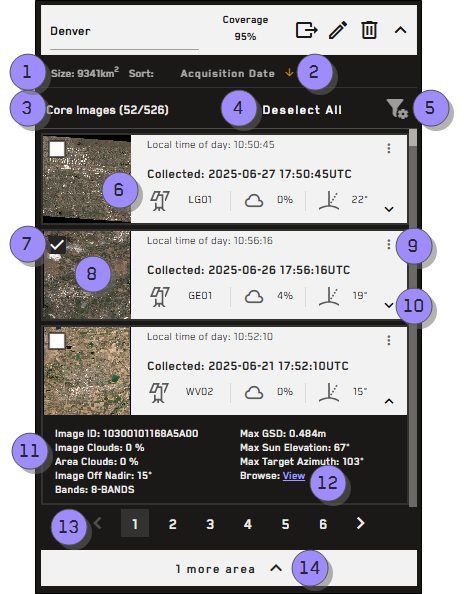
Imagery information is found in the Imagery Results section of the Search Results panel. Use the overview image below and its corresponding table to locate tools in this area.
| Numbered Area / ICON | Description | ||||
|---|---|---|---|---|---|
1 Size | Shows the active area's size in sq km. If you edit the area, the area size updates accordingly. | ||||
2 Sort | Opens the Sort By menu. You can sort imagery results by several different attributes, depending on the product type selected (e.g., Core imagery can be sorted by acquisition date, ground sample distance, image clouds, image off nadir, selected images, or sensor; Vivid imagery can be sorted by selected images or date). By default, search results are sorted with your selected images on top.
| ||||
3 Imagery Selections | The number of images currently selected out of the number of the number of images available. By default, the imagery results that are the most recent and provide the best coverage for the area are automatically selected and load in the viewport. | ||||
4 Deselect All | Deselects all selected images. | ||||
5 Area Filters | Apply filters to the selected area to narrow down the imagery results to view imagery most relevant to you. You can set different filter criteria for each area in your search results. If you change area filter settings, global default filters are turned off. When you make new changes to the global default filters, the global default filter changes overwrite any area filters that you applied to individual areas. See Filtering Areas. | ||||
6 Metadata | Each imagery card shows basic image metadata. You can view:
When viewing Vivid imagery, you will see the resolution; additional metadata is available when expanding the card. | ||||
7 Image Selection Checkboxes | By default, the imagery results that are the most recent and provide the best coverage for the area are automatically selected and load in the viewport. You can add or remove images by selecting the checkbox next to the desired image. Hover over any image tile to show its footprint in the viewport. When adding stereo pairs, you can only select the pair, not individual images. | ||||
8 Thumbnail | Each imagery card shows a thumbnail of the image relative to the viewport. Refer to the thumbnail to help determine the imagery you want to select. You can also do the following with thumbnails:
| ||||
9 Image Menu | Select the Image Menu to perform additional imagery tasks, such as viewing in-depth imagery metadata or zooming to the extent of the image. | ||||
10 View Additional Metadata | Expand any row to view additional metadata about that image.
| ||||
11 Additional Metadata | After expanding an image's metadata, it appears below that image. The metadata you can view depends on the product type you selected from the product drop-down. | ||||
12 View Browse Image | Select View to open a low-resolution browse image in a separate tab. | ||||
13 Pagination Options | Navigate between pages of imagery results. Each page displays 100 images. | ||||
14 More Areas | If you have more than one area, only one area is expanded at a time. To switch between areas, select the More Areas button, then select a different area from the list. |
Imagery Results (List View)
When you expand an area, you will see imagery that is available in that area.
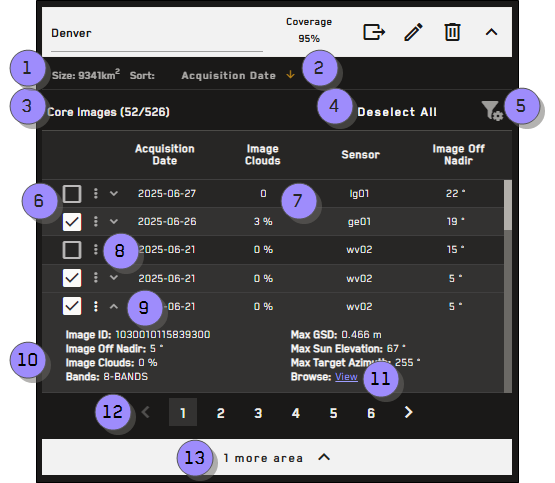
Imagery information is found in the Imagery Results section of the Search Results panel. Use the overview image below and its corresponding table to locate tools in this area.
| Numbered Area / ICON | Description | ||||
|---|---|---|---|---|---|
1 Size | Shows the active area's size in sq km. If you edit the area, the area size updates accordingly. | ||||
2 Sort | Opens the Sort By menu. You can sort imagery results by several different attributes, depending on the product type selected (e.g., Core imagery can be sorted by acquisition date, ground sample distance, image clouds, image off nadir, selected images, or sensor; Vivid imagery can be sorted by selected images or date). By default, search results are sorted with your selected images on top.
| ||||
3 Imagery Selections | The number of images currently selected out of the number of the number of images available. By default, the imagery results that are the most recent and provide the best coverage for the area are automatically selected and load in the viewport. | ||||
4 Deselect All | Deselects all selected images. | ||||
5 Area Filters | Apply filters to the selected area to narrow down the imagery results to view imagery most relevant to you. You can set different filter criteria for each area in your search results. If you change area filter settings, global default filters are turned off. When you make new changes to the global default filters, the global default filter changes overwrite any area filters that you applied to individual areas. See Filtering Areas. | ||||
6 Image Selection Checkboxes | By default, the imagery results that are the most recent and provide the best coverage for the area are automatically selected and load in the viewport. You can add or remove images by selecting the checkbox next to the desired image. Hover over any image tile to show its footprint in the viewport. When adding stereo pairs, you can only select the pair, not individual images. | ||||
7 Metadata Rows | List view allows you to easily see and compare metadata for multiple images at once. Drag and drop any item in your search results to manually reorder the results. Your image selections "restack" in the viewport accordingly; selections at the top of the Search Results panel display on top of selections below them in the panel. | ||||
8 Image Menu | Select the Image Menu to perform additional imagery tasks, such as viewing in-depth imagery metadata or zooming to the extent of the image. | ||||
9 View Additional Metadata | Expand any row to view additional metadata about that image.
| ||||
10 Additional Metadata | After expanding an image's metadata, it appears below that image. The metadata you can view depends on the product type you selected from the product drop-down. | ||||
11 View Browse Image | Select View to open a low-resolution browse image in a separate tab. | ||||
12 Pagination Options | Navigate between pages of imagery results. Each page displays 100 images. | ||||
13 More Areas | If you have more than one area, only one area is expanded at a time. To switch between areas, select the More Areas button, then select a different area from the list. |
More About the Search Results Panel
Imagery results will not display until you draw or upload an area. See Adding Areas.
You can draw/import multiple areas and have multiple areas available in the Search Results panel. However, you can only expand imagery results for one area at a time. New areas are automatically expanded when you draw them; collapse the new area to see all areas, or select the More Areas button at the bottom of the Search Results panel to quickly select and view a different area.

More Areas button
By default, imagery results in MGP Xpress are visible as low resolution browse imagery. When you draw an area, a message displays indicating that you are viewing products in low resolution. Purchase an image to view it in high resolution. See Cart.